こんにちは、車いじり好きのサイファです。
普段は築古物件のDIYリフォームを楽しんでおり、錆びついたネジや固着との戦いには慣れています。ちなみに、整備士資格は持っていますが、今は仕事ではなく趣味程度で車いじりを楽しんでいます。
特に、日本テレビ系『有吉ゼミ』内のコーナー「ヒロミが解決!八王子リホーム」を毎週楽しみに見ていることもあり、工具への愛着は人一倍です。
2025年の年末もすごかったですね!あれはリフォーム!?と思いましたが 笑
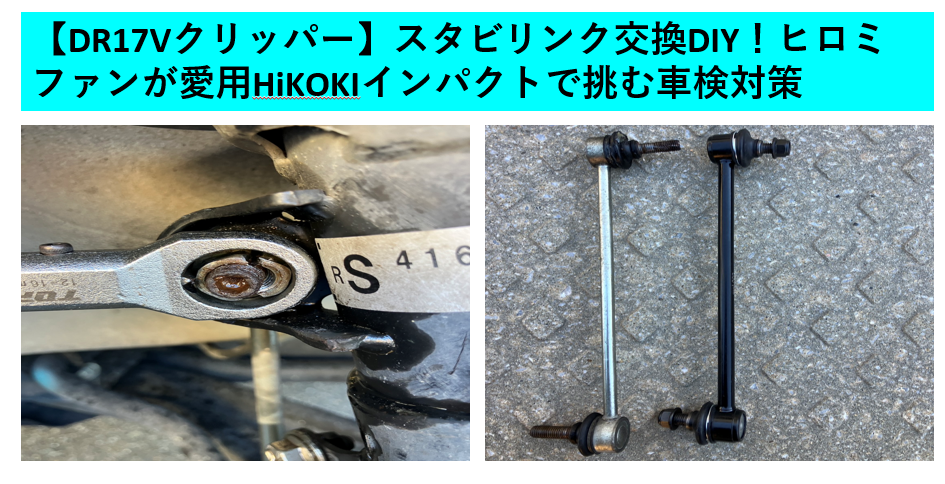
先日、愛車の日産 DR17Vクリッパー(スズキDA17VエブリーのOEM車)の定期点検で、整備工場へ行きました。
サイファ⇒メカニック への依頼事項
「仕事で結構悪路も走行するので、念のため下回りをしっかり見ておいてください。」
下回りの点検後、メカニックの方から診断結果を受け取りました。
「スタビライザーリンクのブーツが破れています。このままでは車検に不合格になるため、交換が必要です。お見積もりは部品代と工賃込みで約13,000円です。(部品代6,600円+工賃6,400円)」
「やっぱりな」という診断でしたが、同時に「高いな〜」という表情を浮かべていたら、担当してくれたメカニックの方が一言。
「サイファさん、ご自身でできますよね?」
この一言が、DIY魂に火をつけました。「自動車整備士資格持ちとして、やってやろうじゃないか」と決意。
“設備もないし車の下回りのDIYはやりたくないなぁ~”とは思っていましたが手持ちの工具が旧日立(現HiKOKI)で、ヒロミさんがHiKOKIのCCOを務めているというご縁も気持ちに後押しし、早速交換に挑戦することにしました。
車の足回りの固着は想像以上に手強かったです…。
この記事では、DR17VやDA17Vオーナー向けに、ディーラー見積もりと同額でプロ仕様の工具を手に入れ、交換を成功させた全記録を公開します。DIYの最大の敵「錆びて回らないネジ」の対処法、そして絶対に譲れない車の整備の注意点まで解説します。
なお、この作業の後、2026年4月にユーザー車検を受けてきましたので、
こちらも合わせてチェックしてみてください👇
📌 スタビリンクとは?
スタビリンクとは、左右のサスペンション(足回り)とスタビライザー(横揺れ防止棒)を繋ぐ部品です。カーブ時の車体の傾き(ロール)を抑え、走行安定性を高める重要な役割を担っています。ブーツが破れると車検に通りません。
レビューのよい安価な社外部品を使用
交換用のスタビリンクは、レビューのよさそうな安価な社外品を選びました!プチチューニング(改造)です⭐
交換後の感想ですが特に問題なさそうです。違和感なく装着できて軽く走っただけですが異音はありませんでした。耐久性はこれからですね

左、外した純正(ブーツが敗れている) 右、今回購入した商品

😱 最初の壁!ネジ山をナメた絶望と秘密兵器「ナットブレーカー」
1. DIY最大の失敗!愛用インパクトでも勝てない錆びの固着
意気揚々と作業開始。メガネレンチとハンマーで緩めて愛用の14.4Vの日立のインパクトで一気に外そうとしましたが、共回りをして失敗。そこで六角レンチでマワリ止めをしながらメガネレンチでナットを回そうとしましたが、長年の錆びで完全に固着しており途中で引っかかって回らない…。最終的に六角穴が空回りしてネジ山をナメてしまいました…。

2. 諦めない!錆びたネジを破壊する最終兵器
六角穴が潰れてグラインダーでぶった切ろうかとおもいましたが、工具は仕事場に…しかたないのでホームセンターに行き偶然見つけたのがこの「トップ工業のナットブレーカー」でした。

結論から言うと、最高です。
これは、錆びて外れないネジを確実に除去する切り札的な存在です。
使い方は簡単でナットブレーカーでナット保持し、14mmの六角を利用して締め付けていくだけ!スタビリンクを外すことに成功しました⭐


3. 最終締め付けはトルクレンチで
新しいナットの締め付けは、緩み防止のため、必ずトルクレンチを使用します。規定値の60Nmでしっかり締め付け、安全を確保しました。
✅ DIYで足回り交換の2つの重要ポイント
車の足回りは特に安全に関わる重要保安部分ですので、以下を必ず守ってください
1. 安全第一!リジッドラック(馬)の使用は絶対
絶対に、ジャッキアップしたまま潜り込まないでください! ジャッキが外れたら命の危険があります。必ず車体全体をしっかりと支えるリジッドラック(通称:馬)を使用してください。
2. 緩みは厳禁!重要保安部品はトルク管理を徹底せよ
フロントスタビリンクの締め付けトルクはDR17V系では約60Nmです。緩みは事故につながるので、必ずトルクレンチで規定値を守って締め付けます。またスタビやサスペンション、メンバー、などの重要保安部品、部位はタイヤが地面に設置した状態(1G)の最終締め付け確認が大切です。
- なぜ必要か?: ジャッキアップした状態で本締めすると、車体を降ろした瞬間にブッシュ(ゴム部品)がねじれた状態で固定され、早期劣化や破損の原因となります。
- 手順: 車両に重みがかかった状態(1G)にしてから、スタビリンクのナットやブッシュをトルクレンチで最終的に締め付けましょう。
💰 まとめ:結果的にかかった費用と得られた価値
今回のDIYでかかった費用は以下の通りです。
| 項目 | 費用目安 |
| 交換用スタビリンク | ¥3,000 |
| 新品リジッドラック | ¥3,000 |
| ナットブレーカー | ¥3,500 |
| KTCメガネレンチ | ¥2,500 |
| 合計 | 約12,000円 |
結果、ディーラーに頼むよりちょっと安い金額で、長く使える相棒の工具一式と、錆びに負けないDIYスキルという大きな財産を手に入れられました⭐
⚠️ 最後に(免責事項)
私は自動車整備士資格を持っていますが、車の足回り整備は命に関わる作業です。作業に自信のない方は、安全のためプロの整備工場に依頼してください
コメント